Product Overview
Grab attention and get your point across using video
CompliView is an interactive video platform within Compligo that lets you enhance, distribute and track video content, helping to bring your compliance program to life. Use CompliView to add interactive features to your videos that increase engagement, expand reach and improve the effectiveness of your videos. With Compliview, you can:
- Make your message hit home with personalized, relevant content.
- Develop content quickly to help your workforce keep pace with evolving regulatory requirements.
- Support different learning styles and preferences.
Breathe Life into your Compliance Programs
CompliView adds a layer of interactivity and engagement to helps breath life into any initiative, including:
New Hire On-boarding / Welcome Video
Make your new employees feel at home in your organization with a welcome video from your leadership team.
Employee Handbook
Add a personal voice to your employee handbook by adding a video introduction featuring your HR team.
Benefit Enrollment
Help employees wade through the complicated process of benefit enrollment using videos to walk them through step by step.
Safety Training
Show employees how to use equipment safely within your work environment.
Code of Conduct
Bring your code of conduct to life with a video introduction from your CEO.
Hazardous Materials Training
Demonstrate how to use hazardous materials within your organization with on-the-job video snippets
Implementation Steps in this Guide
Record your Video
The first part of this process is to record your video. The equipment needed to do this can range from the video app on your mobile device to a full blown production crew with stage, sound and digital video camera. All you need is a video file to form the basic for creating an interactive CompliView video, and we support all major video formats.
Here is an example videos that you can download and use to try out CompliView:
- Bike Lanes Training: This ZIP file contains a video, two images and a PDF that you can use to practice creating interactive videos with CompliView. Click here to download.
Create a CompliView Library Item and Upload your Video
- Click on the Library Tab
- Select a Binder
- Select a Folder
- Click on the Plus button to a add a new Library Item
- Add a Title
- Set the Type to CompliView
- Set the Read Permissions group to Administrators (you can add more groups later)
- Click New Video
- Add a Video Name
- Add a Short Description
- Click Choose File and select the video file from your computer
- Click Save
- Wait a few minutes for the system to process the upload. Continue to Step 5 of the next section to check if it is done.
Edit, Publish and Distribute the Video
Create a new Draft Version to Edit the Video
- Click on the Library Tab
- Search for Title of the Library Item and click on it
- Click on the Edit button to view the list of versions
- Click Create Draft to the right of the latest published version
- Click Edit next to the Draft version that was just created (Note: You may see the text "Video is still being processed, please wait..." instead of a video. If so, wait a few minutes for processing to complete.)
- Embed interactivity within the video (See the sections below for guidance)
Publish the Draft Version
- Click Publish to finalize edits to your video
- Click on the Permissions subtab and add the appropriate group(s) of users who have permission to view this policy within the library
Schedule the activity for distribution
- Click on the Workspaces tab
- Click on a workspace
- Click on an initiative
- Click the plus button (+) to add a new activity template, and then enter the following fields:
- Title: Give the Activity Template a title (usually the same as the Library Item)
- Type: Set the Type to CompliView
- Workflow: Set the workflow to Computer Based Training
- File In: Select a folder, such as Personnel
- Click Save
- Click Keystages
- Click Edit next to the Complete Training stage
- Click Add new
- Select Library Item under "Template Keystage Item Type"
- Select the name of the Library Item you created above under Library item
- Click on Groups and assign to the appropriate groups, such as All Employees
- Click on Schedule and set a one-time schedule based on the Hire Date.
- Click Save
Add Annotations to your video
Annotations allow you to add interactive components to bring your videos to life. The following sections review each type of annotation that you may want to add to your videos.
Add a Quiz
This section covers how to add a quiz and associated pass/fail logic. This guide will show you how to:
- Add a multiple question, multiple choice quiz to your video
- Set the Pass/Fail Options, such as minimum passing percentage and logic to force the user to watch the video again before they are allowed to reattempt the quiz
To add a quiz

- Click on the question mark (?) icon on the toolbar to open the quiz builder
- Click on Start Time and enter a Start Time or percentage of the video at which time the quiz will display. See the Appendix at the end of this document for examples to help understand the time formats available.
- Leave Pause set to Pause: No
- Click More... and then change Gate from Gate: N to Gate: Y. This ensures that the user cannot continue unless they complete the quiz. This also overrides the Duration setting because the user cannot continue until the quiz is completed.
- Add the first question within the first text field on the screen. Use the +Choice and +Input buttons to add the correct number and type of answers, typing in the text of each as you go. Use the +Question button to add additional questions.
- Select the Radio button to the left of each correct answer. Make sure you have a correct answer selected for each question. Use the Prev and Next buttons to move between the questions and ensure that each is setup properly
To setup the Pass/Fail Options
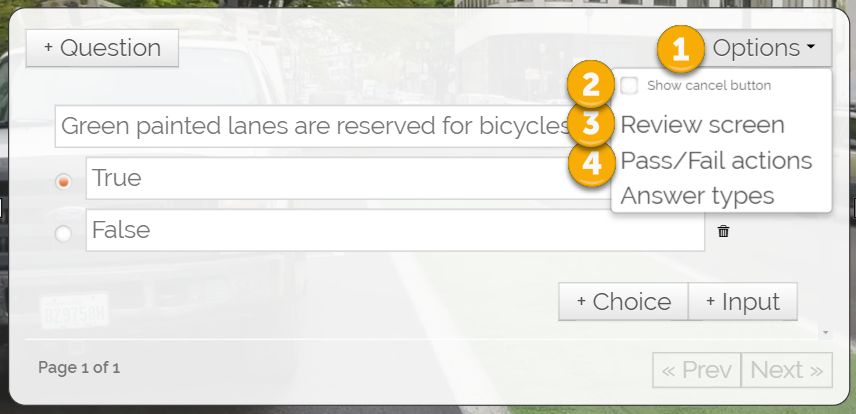
- Click on Options and uncheck "Show cancel button"
- Click on Options again and select Review Screen
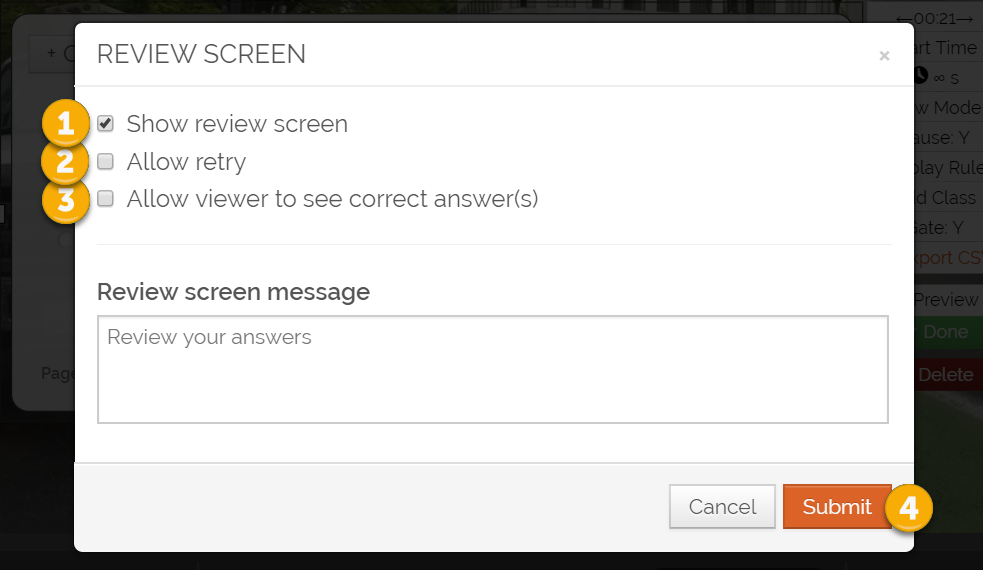
- Recommend: Leave Show Review Screen checked to review with the user which questions were passed and/or failed
- Recommend: Uncheck Allow Retry to force the user to watch the video again before reattempting the quiz
- Recommend: Uncheck Allow viewer to see correct answer(s) to force the user to come up with the correct answer on their own
- Click Submit
- Click on Options again and select Pass/Fail Actions
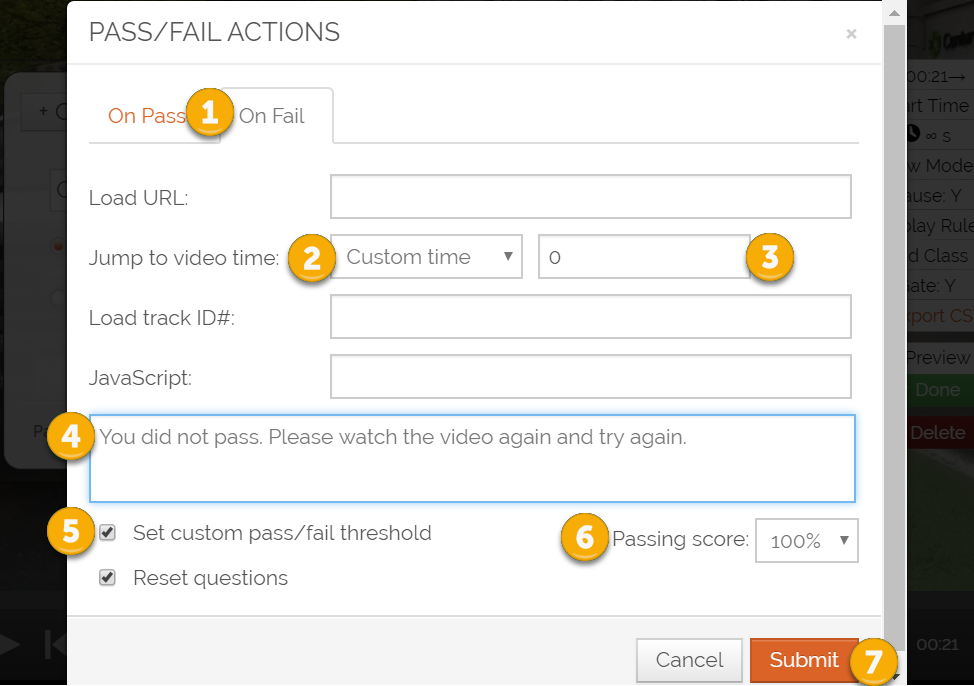
- Click on the Fail tab
- Set "Jump to Video Time" to Custom Time" and then enter "0" to return the user to the beginning of the video, or any other time using the standard time formats used under Start Time above.
- In the box that says Alternative Message on Fail, type "You did not pass. Please watch the video again and try again." or similar text
- Check the box for Set custom pass/fail threshold" and set the Passing Score to 100% or similar value
- Recommend: Leave Reset Questions checked to force the user to retake the quiz without displaying their previous choices.
- Click Submit
- Click Done
- Click Save Draft
- Click Publish
To Edit a Quiz
- Follow the steps above to Create a new Draft Version to Edit the Video
- Click on the Skip to Next Comment button until you get to the existing Quiz

- Follow the steps above to make the appropriate edits to your quick
- Click Done
- Click Save Draft
- Click Publish
Add an Image Overlay
Upload the Image Overlay
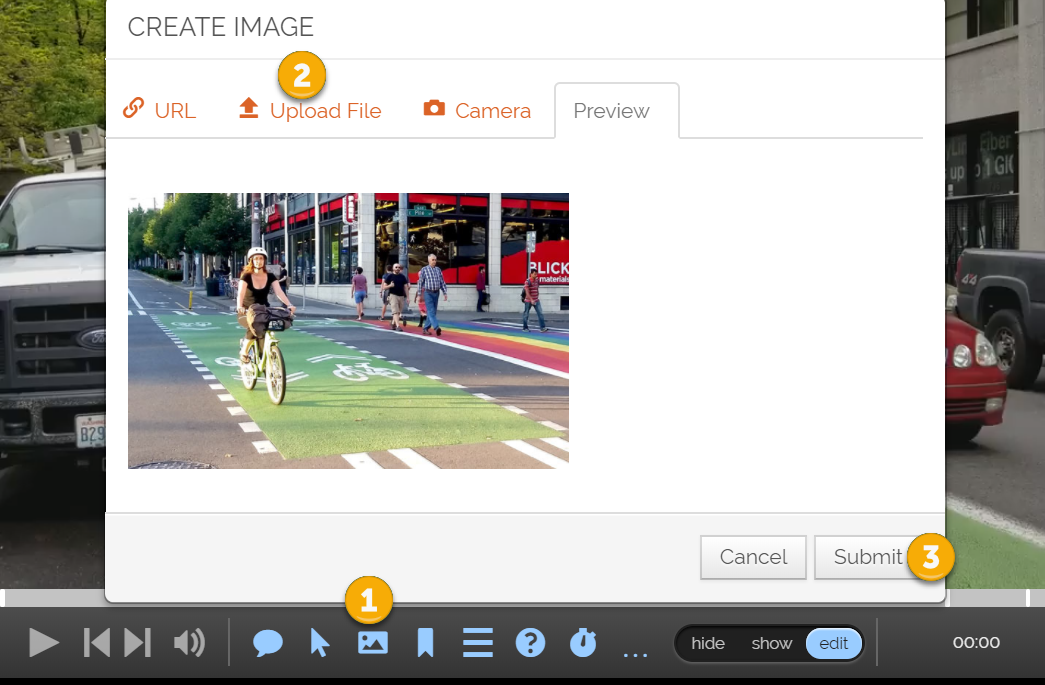
- Click on the Image icon on the toolbar
- Choose one of the following to capture an image:
- URL: Paste in a URL from the internet that links to an image file
- Upload File: Upload a file from your computer
- Camera: Capture an image from your computer webcam or mobile device
- Click Submit
Setup the Image Overlay
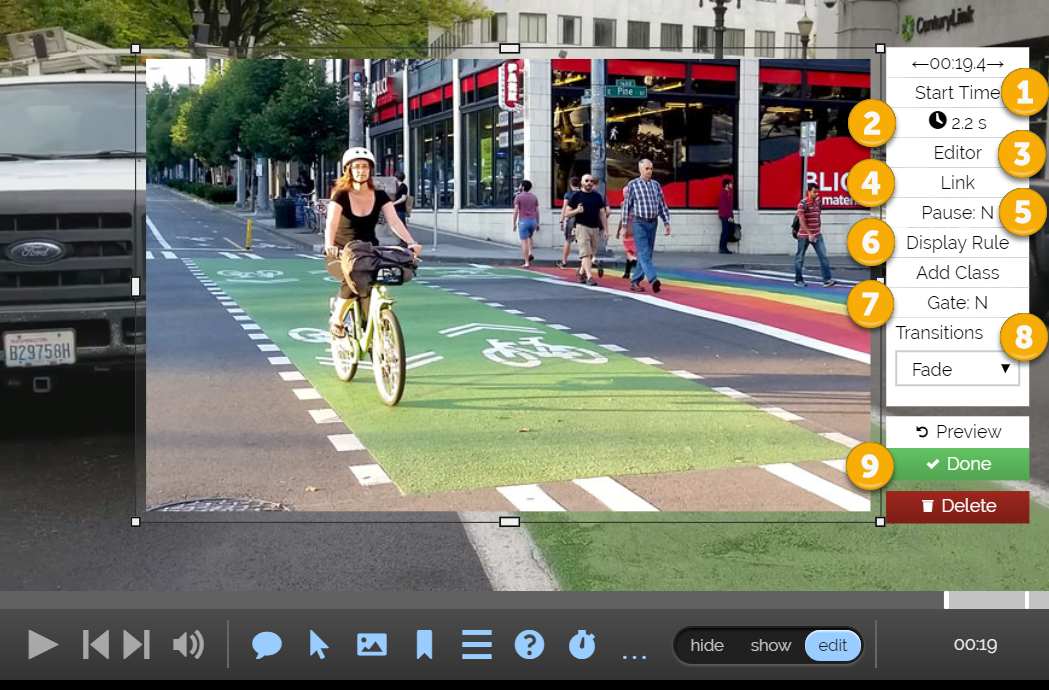
- Click on Start Time and enter a Start Time or percentage of the video at which time the overlay will display. Some example values:
- 45 to display the overlay 45 seconds into the training
- 99.9% to display the overlay at nearly the end
- 5:00:00 to display the overlay at exactly the 5 minute point
- 5:10:50 to display the overlay at 5 minutes, 10 seconds and 50 milliseconds
- 1:2:3:4 to display the overlay at 1 hour, 2 minutes, 3 seconds and 4 millisec
- Click on the Clock to set the duration of the overlay.
- Click Link to make the image clickable, which will bring up the following tabs:
- Under Actions, set one of the following:
- URL: Add a URL here to add a hyperlink to a webpage
- Jump to video time: When clicked the video will jump to a specific video time. Follow the format above under Start Time for examples.
- Under Behavior, you may set either of the following:
- Pause video on click:
- Action to Take if the video doesn't click: You may choose either Continue Video to keep playing, or Loop Back to loop to the beginning Start Time of the overlay
- Under Actions, set one of the following:
- Click Pause and set it to Yes if you want to pause the video at the start of the overlay. (Default: No)
- Click Display Rule to show this overlay when another action occurs, such as the completion of a quiz.
- Click Gate and set it to Yes if you want to require that the user clicks on an overlay before continuing the video. (Default: No)
- Click Transitions to set the transition to Fade, Pop or Slide Up.
- Click Done
- Click Save Draft
- Click Publish
Add a Text Overlay
Create a Simple Text Overlay
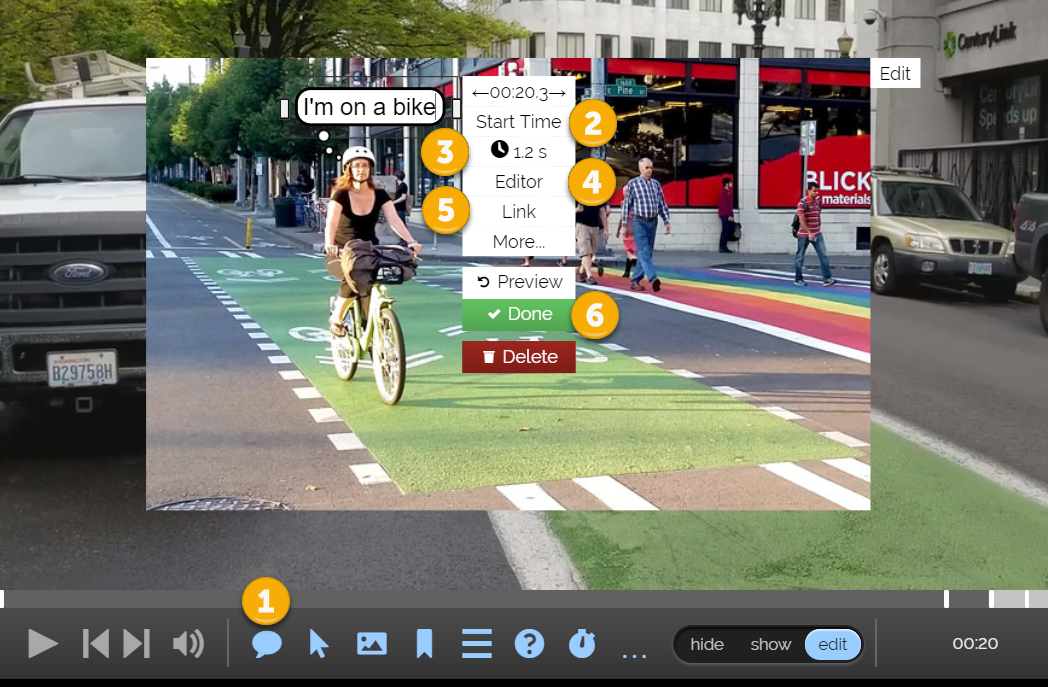
- Scan through the video to the location to add the Text Overlay (You can adjust this later)
- Click on the Thought Bubble on the Toolbar to create a Text Overlay
- Click on Start Time and enter a Start Time or percentage of the video at which time the overlay will display. See the Start Time under quizzed above for example values.
- Click on the Clock to set the duration of the overlay.
- Click on Editor to change the text of the overlay
- Click Link to make the image clickable, which will bring up the following tabs:
- Under Actions, set one of the following:
- URL: Add a URL here to add a hyperlink to a webpage
- Jump to video time: When clicked the video will jump to a specific video time. Follow the format above under Start Time for examples.
- Under Behavior, you may set either of the following:
- Pause video on click: This will pause the video if the user clicks on the Link
- Action to Take if the video doesn't click: You may choose either Continue Video to keep playing, or Loop Back to loop to the beginning Start Time of the overlay
- Under Actions, set one of the following:
- See the next section for settings that are hidden under More...
- Click More... to open up the following advanced options:
- Change Pause from Pause: N to Pause: Y to pause the training at the position that the text overlay appears
- Click Styles to change the color and opacity of the text box. Click Submit to save.
- Click Variables to add a variable to the text (such as the results of a quiz)
- Change Gate from Gate: Y to Gate N to ensure that the user cannot continue unless they click on the text.
- Change Theme to change the type of text box that surrounds your text
- Change Tail Position to adjust the location of the tail for the Speech and Thought themes
- Click Transitions to set the transition to Fade, Pop or Slide Up.
- Click Done
- Click Save Draft
- Click Publish
Add a Hotspot
Video: Setting up a simple hotspot that links to www.compli.com over the Image Overlay.
- Pause the video at the point at which you would like to add the annotation (Or use the Start Time to set this)
- Click on the mouse pointer (arrow) icon on the toolbar. This will bring up a menu with three tabs:
- Under Actions, you may set the following options:
- URL: Type in a website address to link to.
- Jump to video time: Set a time or other annotation to jump to within the video. This time uses the same format as the "Start Time". See the index below for examples.
- Under Behavior, you may set the following options:
- Pause video on click: Select an option to pause the video when the user clicks on the URL. This allows them to come back to the same point in the video after viewing the linked webpage.
- Action to take if the viewer doesn't click: Determine whether the video shall continue if the link is not clicked or loop back to an earlier time. This is useful if you want to require the user to click on a link or one of multiple links.
- Under Advanced, change these options only if you know what you are doing. These options are beyond the scope of this document.
- Under Actions, you may set the following options:
- To change the Start Time of the annotation, click on Start Time and enter a Start Time or percentage of the video at which time the quiz will display. See the Appendix at the end of this document for examples to help understand the time formats available.
- Click Duration to set the duration that the hotspot will appear. See the Appendix at the end of this document for examples to help understand the time formats available.
- Click Editor to type in the Text that will appear on the hotspot as well as its Position and Color.
- Drag the corners and sides of the Annotation to size it appropriately.
- Click Done
- Click Save Draft
- Click Publish
Add Chapters
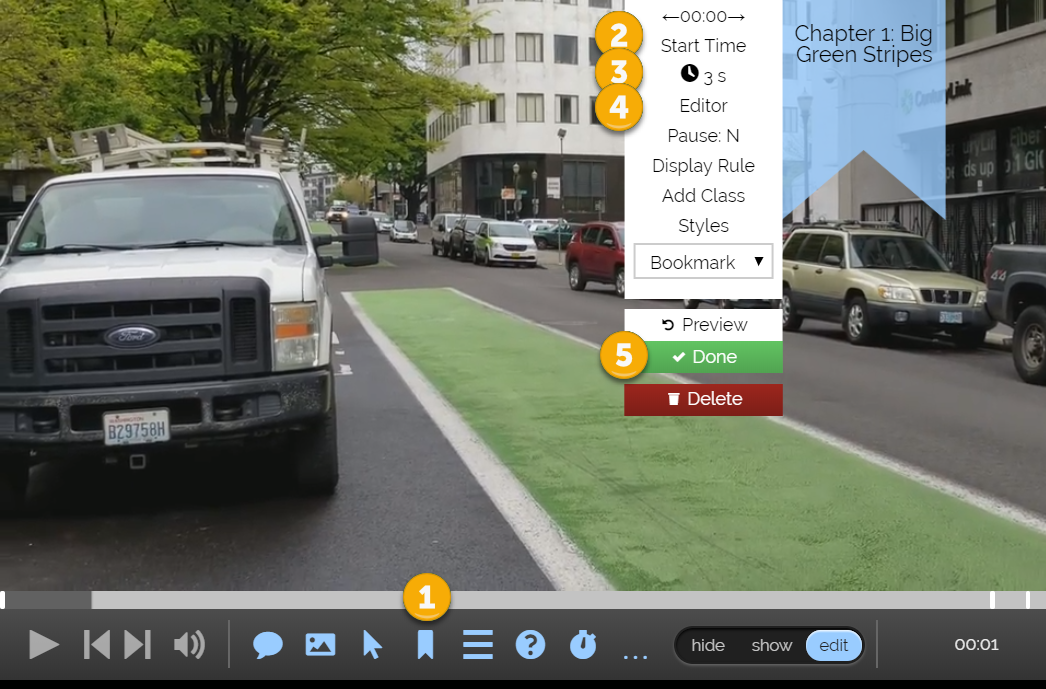
- Pause the video at the point at which you would like to add the Chapter (Or use the Start Time to set this)
- Click on the Chapter Icon (Looks like a bookmark) on the toolbar.
- To change the Start Time of the annotation, click on Start Time and enter a Start Time or percentage of the video at which time the quiz will display. See the Appendix at the end of this document for examples to help understand the time formats available.
- Click on the Clock to set the duration of the overlay, which will display on the screen for the user. Set this to 0 to hide the chapter.
- Click Editor or click within the text box to set a title of your Chapter.
- Click More... and then on click on the dropdown box under Styles to change the look and feel of the chapter.
- Click Done
- Click Save Draft
- Click Publish
Add a Chapter Menu
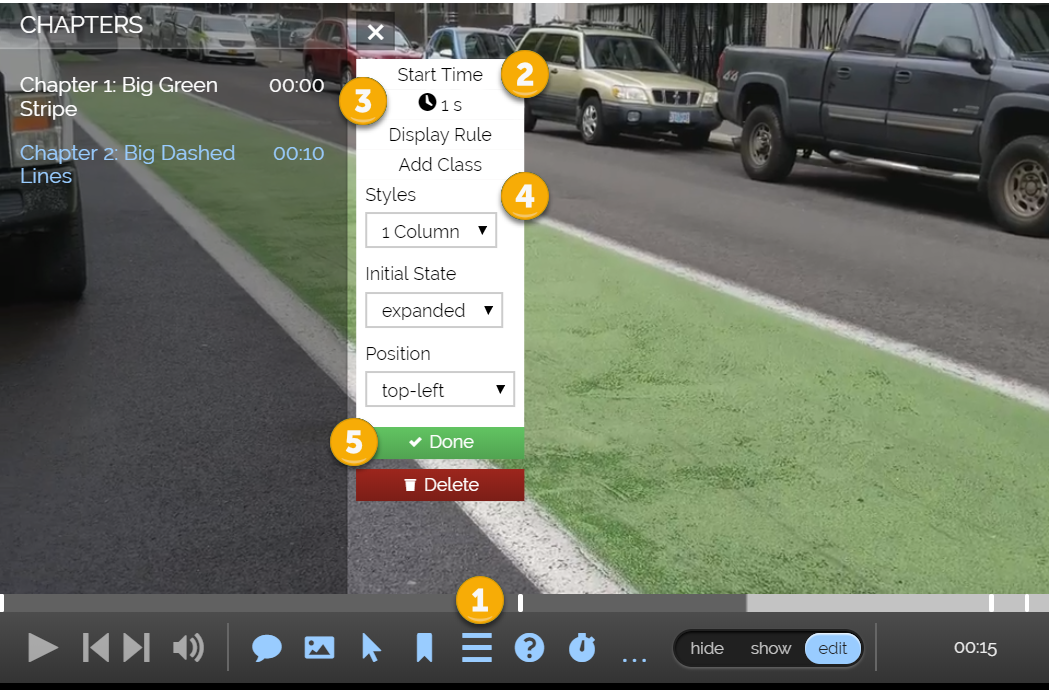
- Click on the Chapter Icon (3 parallel lines) to create a Chapter Menu
- To display the chapter menu, click on Start Time and enter a Start Time or percentage of the video at which time the quiz will display. Usually this would be displayed at the beginning of the video. See the Appendix at the end of this document for examples to help understand the time formats available.
- Click on the Clock to set the duration of the overlay, which will display on the screen for the user. Set this to 0 to hide the chapter menu.
- Click More... and then on click on the dropdown box under Styles to change the look and feel of the chapter menu.
- Click Done
- Click Save Draft
- Click Publish
Add a Drawing
Video: Setting up a simple drawing to call attention to a portion of the video
- Pause the video at the point at which you would like to add the Chapter (Or use the Start Time to set this)
- Click on the Elipsis Icon (...) to expand the toolbar and then choose the Pencil Icon to add a Drawing.
- To change the Start Time of the annotation, click on Start Time and enter a Start Time or percentage of the video at which time the quiz will display. See the Appendix at the end of this document for examples to help understand the time formats available.
- Click on the Clock to set the duration of the overlay, which will display on the screen for the user. Set this to 0 to hide the chapter.
- Click either the Red, Green, Blue or Yellow Blocks to select the color of your pencil. Then use your stylus, finger, mouse or other pointing device to draw on top of the video.
- You can use Undo and Clear to fix any mistakes
- Click Done
- Click Save Draft
- Click Publish
Appendix: Additional Detail on Annotation Options
Start Time
Click 'Start Time' to fine tune it down to the thousands of a second or a specific percentage in the video. Time fields are flexible and accept the following inputs:
- 20 (20 seconds)
- 00:20.000 (20 seconds)
- 1:37 (1 minute and 37 seconds)
- 1:2:27 (1 hour, 2 minutes and 27 seconds)
- 97 (1 minute and 37 seconds)
- 15% (15% of the way into the video.)
- -15 (15 seconds before the end of the video)
- -10% (10% before the end of the video)
Duration
The duration of time that the annotation remains on screen. If Pause is set to Y, the duration of the annotation is the duration it is paused.
Link
What happens when a viewer clicks on the annotation.
Pause
Set Pause:Y if you'd like the video to pause when it reaches this annotation. Set Pause: N if not.
Note when you set Pause:Y, the duration of the annotation is the duration it is paused.
Note: When Pause is set to Y, ensure Gate is set to N.
Gate
A gate is a point in the video that a viewer can not pass unless they interact with that annotation. This is used most often to ensure that someone takes a quiz before continuing on in the video.
Note: When Gate is set to Y, ensure Pause is set to N.
Display Rule
Used to display an annotation only under certain conditions (for example only for new viewers). You set the JavaScript Expression under which you'd like the annotation to display (ex/ viewer=='new'). You can pass in these JavaScript Expressions from an external system using the APIs or set it when a viewer clicks on another annotation in the Link option (ex/ viewer="new").
Styles
Change the background color and opacity.
Themes
Canned styles for the annotation. Most often used to change the text color from white to black or vice versa (select "White" or "Black".)
Transitions
How the annotation appears and disappears from the screen.
Comments
0 comments
Please sign in to leave a comment.